
A Step-by-Step Guide to Drawing Santa Claus
Drawing Santa Claus is a fun and festive way to celebrate the holiday season. Whether you’re a beginner or an experienced artist, following a step-by-step process can help you create a cheerful and recognizable depiction of Santa. This guide will take you through the stages of drawing Santa Claus, complete with an illustration of the final product.
Step 1: Start with Basic Shapes
Begin by sketching the basic shapes that will form Santa’s head and facial features. Start with a large circle for the head. Draw a horizontal line across the middle of the circle and a vertical line down the center to help place the facial features symmetrically. Add a smaller oval below the main circle for the base of the beard. These guidelines will ensure that Santa’s face is well-proportioned.
Step 2: Outline the Hat
Next, draw Santa’s iconic hat. Start by sketching the base of the hat, which sits just above the horizontal line on the head. Draw a curved line that follows the shape of the head, forming the brim of the hat. Then, draw the top part of the hat as a drooping triangle that falls slightly to one side. Add a fluffy pom-pom at the end of the triangle to complete the look.
Complete video down

Step 3: Draw the Facial Features
Now, it’s time to add Santa’s facial features. Begin with the eyes, which should be placed slightly below the horizontal guideline. Draw small, oval shapes for the eyes, and add pupils inside them. Then, sketch the eyebrows as thick, curved lines above the eyes. Below the eyes, draw a small, round nose. For Santa’s mouth, draw a wide smile that sits near the bottom of the main circle, and add a mustache that curves around the mouth.
Step 4: Add the Beard and Hair
Santa’s beard is one of his most defining features. Using the oval you drew earlier as a guide, sketch a full, fluffy beard that extends from his cheeks down to the base of the oval. The beard should have a wavy, uneven outline to give it a soft, fluffy appearance. Draw lines from the edges of the hat down to the beard to indicate Santa’s hair.
Step 5: Finalize the Details
Now that the main features are in place, it’s time to refine your drawing. Go over your lines to make them more defined, and add any additional details, such as creases in the hat, texture in the beard, or highlights in the eyes. You can also add a small curved line on each side of the nose to give it a more three-dimensional look.
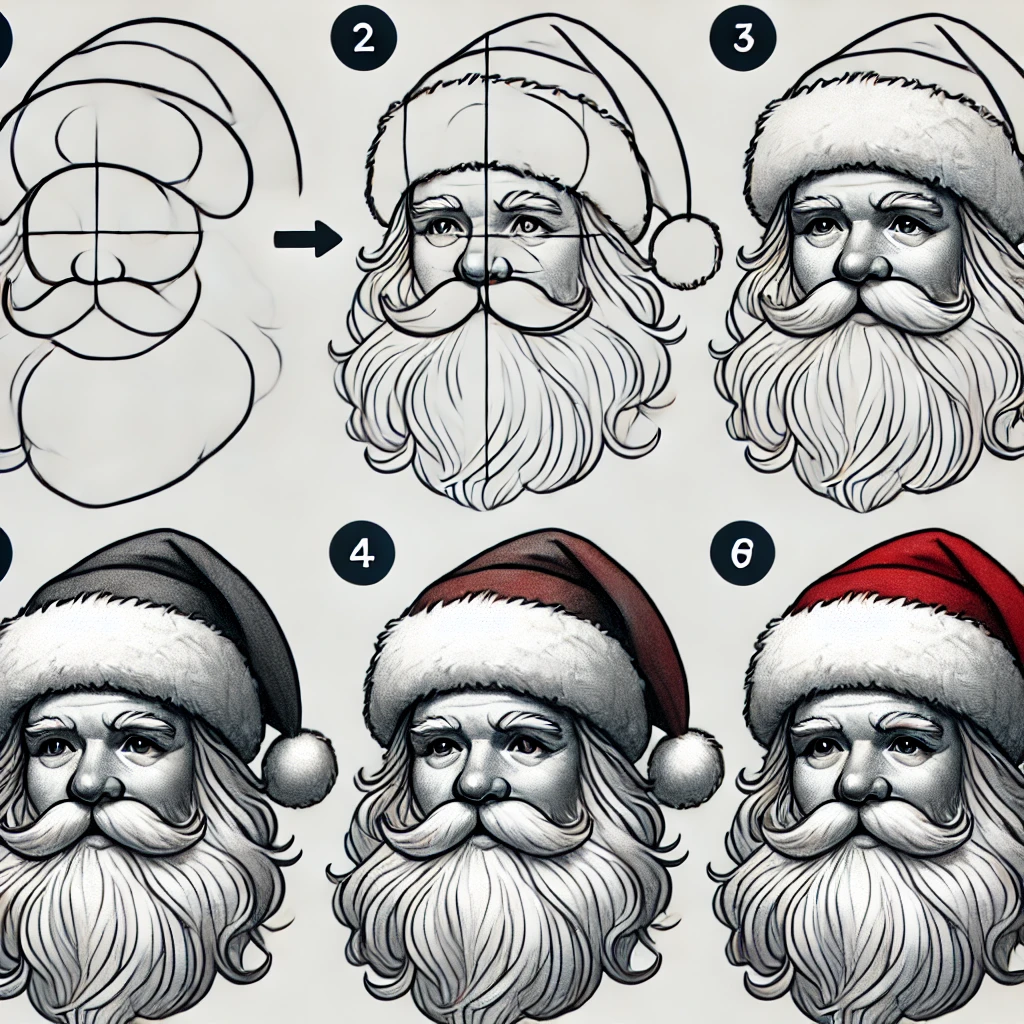
Here is the additional clean and detailed visual guide showing the step-by-step process of drawing Santa Claus. This set of images should help you better understand each stage of the drawing process.
Step 6: Color Your Drawing
With the drawing complete, it’s time to add color. Use red for Santa’s hat, a light peach or pink for his face, white for the beard and hat brim, and black for the eyes and eyebrows. Adding some shading can give your drawing more depth, especially in the beard and around the edges of the hat.
Conclusion
By following these steps, you’ll create a charming and festive drawing of Santa Claus that you can be proud of. Whether you’re creating holiday cards, decorations, or just enjoying a seasonal art project, this guide provides a clear and easy-to-follow process to bring Santa to life on paper.